Reviewing Scanned Images (Standard Mode)
After scanning, review images for quality assurance. If you do not want to review scanned images, skip to the storing process.
Note: Scanned images are only available for review if the Store Immediately feature is disabled.
Navigating Scanned Documents
Scanned images will appear in the Scanning Explorer Pane, under Revision.
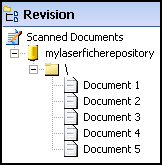
Images are organized into documents. Documents are grouped by their destination (as defined in Default Properties).
-
Select a document to review its pages in the Display Pane. Use the Display Pane's toolbars to navigate through and rotate documents.
-
Right-click items for additional options.
Navigating to Errors
Use these toolbar buttons to navigate to documents that have errors associated with them. Learn more about troubleshooting.

|
Displays the previous document in the Revision Tree with an error. Hover over the field's  error icon for more information. error icon for more information. |

|
Displays the next document in the Revision Tree with an error. |
Editing Documents
While reviewing, you can:
 Delete pages
 Rotate pages
Note: The Rotate Page feature can only be used for images that have not yet been stored in a Laserfiche repository.
- Select a document in the Scanning Explorer Pane.
- Navigate to a page using the right
 and left
  buttons on the Display Pane's Navigation toolbar.
- From the Edit menu, point to Rotate Image and select Rotate right or Rotate left.
 Insert new pages
Note: This feature can only be used for images that have not yet been stored in a Laserfiche repository. For information on scanning pages into images that have been stored, see Scanning into an Existing Document.
- Select a document in the Scanning Explorer Pane.
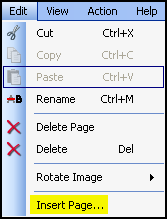
- Select Insert Page under Edit in the menu bar.
- In the Insert New Page dialog box, specify where the new page should be inserted.
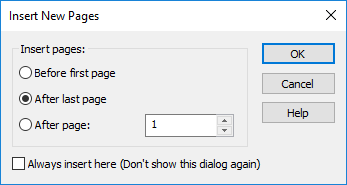
- In the Laserfiche Scanning dialog box, select OK when you are ready to begin scanning. Any OCR and/or image enhancement processes assigned to the document will be applied. The new image will appear in the specified location.
 Delete documents
- Right-click a document in the Scanning Explorer Pane.
- Select Delete.
 Split documents
Split a document into multiple documents by either creating a new document or using the split document feature
Create Document
This feature pulls a single page out of a document and moves it to a new, separate document.
Example: A document contains three pages. Selecting Create Document while viewing page 2 will pull the page out of the document and move it to a new, separate document.
- Select a document in the Scanning Explorer Pane.
- Navigate to a page using the
 right and
  let buttons on the Display Pane's Navigation toolbar.
- Click the
 New Document button. The new document will appear in the Scanning Explorer Pane.
Split Document feature
This feature pulls one or more pages out of a document and moves them to a new, separate document.
Example: A document contains five pages. Selecting Split Document while viewing page 2 will pull pages 2-5 out of the document and place them in a new, separate document.
- Select a document in the Scanning Explorer Pane.
- Navigate to a page using the
 left and
  right buttons on the Display Pane's Navigation toolbar.
- Click the
 Split Document button. The displayed page, and all following pages, will be used to create the new document. The new document will appear in the Scanning Explorer Pane.
 Combine documents
- Locate the two documents you want to combine in the Scanning Explorer Pane.
- Drag one document on top of the other.
 Edit a document's destination
Tip: A default destination can be assigned to all documents in a scanning session by configuring default properties.
To modify a specific document's destination, use one of the following methods.
Move to New Folder
This feature changes a single document's destination to a folder named New Folder. This folder will be created in the Laserfiche repository when its documents are stored. If a folder by this name already exists, it will be appended with (number), such as New Folder (2).
- Select a document in the Scanning Explorer Pane.
- Select Move to New Folder in the Document Properties Pane. A new folder and document will appear in the Scanning Explorer Pane.
- You can rename the new document and edit its destination.
Modifying a Folder's Destination
To modify the destination assigned to one or more scanned documents, select a folder in the Scanning Explorer Pane and modify its destination in the Folder Properties Pane. All document listed underneath the folder will receive a new destination.
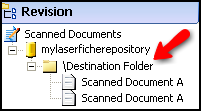
Drag and drop
Drag a document out of its folder and drop it on top of a different folder. The document's destination will now correspond to the new folder.
 Modify document name, metadata, and/or a volume
Note: A document's name, template, and volume cannot be edited when scanning pages into an existing document.
Tip: A default set of metadata and a volume setting can be assigned to all documents in a scanning session by configuring default properties.
- Select a document in the Scanning Explorer Pane.
- In the Document Properties Pane, edit the document's name. All documents must have a unique name. For example, if you assign a default name of My Scanned Document, only the first document sent to a Laserfiche repository will retain this exact name. All additional documents will be appended with (number), such as My Scanned Document (2). The token button can be used to name the document, before scanning, under Default Properties.

- In the Fields tab, edit the document's template and/or field values.

- Select the Tags tab. Assign and/remove tags and tag comments.

- Select the Settings tab.
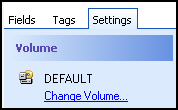
- Specify a volume for the document(s) to be stored in.
 Rescan pages
Note: The
Rescan Page feature is not recommended for Universal Capture, and can only be used for images that have not yet been stored in a Laserfiche repository.
- View the page you want to rescan in the Display Pane.
- Place the corresponding page in your scanner.
- Select the
 Rescan button from the toolbar to start scanning. Any OCR and/or image enhancement processes assigned to the original image will be applied. The new image will appear in place of the original image.
 Scan additional pages
- To scan additional pages as a new document, select the
 Start Scanning button from the toolbar.
-
To scan and append pages to the last document scanned,
select the  Scan and append button from the toolbar. This will initiate the Resume Scanning feature.
Note: A scanning session's Document Length setting limits the number of pages a document can contain. This may affect the Resume Scanning feature.
Next Step
After reviewing a scanned document, store it in a repository.


 error icon for more information.
 Delete pages
 Rotate pages
 Insert new pages
 Delete documents
 Split documents
 Combine documents
 Edit a document's destination
 Modify document name, metadata, and/or a volume
 Rescan pages
 Scan additional pages
 right and
  left buttons on the Display Pane's Navigation toolbar.
 Delete button.

 New Document button. The new document will appear in the Scanning Explorer Pane.
 Split Document button. The displayed page, and all following pages, will be used to create the new document. The new document will appear in the Scanning Explorer Pane.


 Rescan button from the toolbar to start scanning. Any OCR and/or image enhancement processes assigned to the original image will be applied. The new image will appear in place of the original image.
 Start Scanning button from the toolbar.
 Scan and append button from the toolbar. This will initiate the Resume Scanning feature.